

可以通过brew install nodejs 或 sudo apt-get install nodejs 安装。不过版本也许不是最新的,所以建议到 http://nodejs.org/download/ 直接下载对应系统下的安装包。如果你是windows的用户,我想说,接下来的旅程对你而言将是无尽的折腾,我要是你,要么合上笔记本,远离这篇文章;要么咬咬牙,卖半个肾,去搞台mbp回来。
安装完成后, 测试一下版本号:
tchen@tchen-mbp:~$ node -v
v0.8.5
tchen@tchen-mbp:~$ npm -v
1.1.59
最新的meteor需要nodejs 0.8.x版本支持。
Meteor目前的版本与mongodb紧密绑定,所以你需要安装mongodb(mongodb是什么?)。建议去官网下载最新版本安装: http://www.mongodb.org/downloads。
安装完成后,可以用 mongod 命令启动数据库服务器,用 mongo 命令打开命令行界面访问mongodb。
Meteor的安装很简单,通过如下命令就可以安装一个官方的最新稳定版本:
$ curl https://install.meteor.com | /bin/sh如果你和我一样,喜欢cutting edge的刺激,可以 clone meteor的repo,并切换至devel branch,然后安装:
$ git clone git://github.com/meteor/meteor.git
$ cd meteor
$ git checkout devel
$ sudo ./install.sh
安装脚本会先下载dependency kit,然后安装整个framework。
$ meteor create meteor-example
meteor-example: created.

To run your new app:
   cd meteor-example
   meteor
$ cd meteor-example
$ meteor
[[[[[ ~/projects/meteor-example ]]]]]

Running on: http://localhost:3000/
在浏览器中打开 http://localhost:3000/ 就可以访问这个项目了。
进入到meteor-example目录后,ls -la 可以看到项目的目录结构:
$ ls -la
total 24
drwxr-xr-x   6 tchen  staff   204 12 22 10:10 .
drwxr-xr-x  47 tchen  staff  1598 12 22 10:10 ..
drwxr-xr-x   5 tchen  staff   170 12 22 10:10 .meteor
-rw-r--r--   1 tchen  staff    31 12 22 10:10 meteor-example.css
-rw-r--r--   1 tchen  staff   193 12 22 10:10 meteor-example.html
-rw-r--r--   1 tchen  staff   433 12 22 10:10 meteor-example.js
其中有一个隐藏的文件夹 .meteor,它记载了当前项目的配置信息,运行时所需要的各种文件,以及项目的local db(第一次启动meteor的时候会自动生成)。
我们来看看 .meteor/packages 里记录了什么:
$ cat .meteor/packages
# Meteor packages used by this project, one per line.
#
# 'meteor add' and 'meteor remove' will edit this file for you,
# but you can also edit it by hand.

autopublish
insecure
preserve-inputs
这是Meteor用来进行包管理的配置文件,它记录了你的项目里用了那些packages。
$ meteor --help
Usage: meteor [--version] [--help] <command> [<args>]

With no arguments, 'meteor' runs the project in the current
directory in local development mode. You can run it from the root
directory of the project or from any subdirectory.

Use 'meteor create <name>' to create a new Meteor project.

Commands:
   run        [default] Run this project in local development mode
   create     Create a new project
   update     Upgrade to the latest version of Meteor
   add        Add a package to this project
   remove     Remove a package from this project
   list       List available packages
   bundle     Pack this project up into a tarball
   mongo      Connect to the Mongo database for the specified site
   deploy     Deploy this project to Meteor
   logs       Show logs for specified site
   reset      Reset the project state. Erases the local database.

See 'meteor help <command>' for details on a command.列出meteor支持的package。注意,meteor的package(也自诩为smark package)和npm package不是一回事。meteor有自己的一套生态系统。以下所列的package都是开箱即用,用meteor add/remove安装/卸载即可。聪明如你一定会想到其实meteor add/remove就是修改 .meteor/packages 文件。
$ meteor list

accounts-base           A user account system
accounts-facebook       Login service for Facebook accounts
accounts-github         Login service for Github accounts
accounts-google         Login service for Google accounts
accounts-password       Password support for accounts.
accounts-twitter        Login service for Twitter accounts
accounts-ui             Simple templates to add login widgets to an app.
accounts-ui-unstyled    Unstyled version of login widgets
accounts-weibo          Login service for Sina Weibo accounts
amplify                 API for Persistant Storage, PubSub and Request
autopublish             Automatically publish the entire database to all clients
backbone                A minimalist client-side MVC framework
bootstrap               UX/UI framework from Twitter
code-prettify           Syntax highlighting of code, from Google
coffeescript            Javascript dialect with fewer braces and semicolons
d3                      Library for manipulating documents based on data.
email                   Send email messages
force-ssl               Require this application to use secure transport (HTTPS)
handlebars              Simple semantic templating language
htmljs                  Easy macros for generating DOM elements in Javascript
http                    Make HTTP calls to remote servers
insecure                Allow all database writes by default
jquery                  Manipulate the DOM using CSS selectors
jquery-history          pushState module from the jQuery project
jquery-layout           Easily create arbitrary multicolumn layouts
jquery-waypoints        Execute a function when the user scrolls past an element
less                    The dynamic stylesheet language.
localstorage-polyfill   Simulates the localStorage API on IE 6,7 using userData
madewith                Made With Meteor badge
preserve-inputs         Automatically preserve all form fields with a unique id
showdown                Markdown-to-HTML processor
spiderable              Makes the application crawlable to web spiders.
stylus                  Expressive, dynamic, robust CSS.
underscore Collection of small helper functions: _.map, _.each, ...由于meteor的db放在 .meteor/local/db 下,所以使用 mongo 命令行查看系统db找不到meteor的数据库。meteor提供了自己的mongo cli供调试使用,这条命令运行前必须保证Meteor server处于开启状态。即运行了 meteor 命令。
$ meteor mongo
MongoDB shell version: 2.2.1
connecting to: 127.0.0.1:3002/meteor
> show dbs
local (empty)我们先安装几个package,看看meteor的威力。
$ meteor add accounts-ui
accounts-ui: Simple templates to add login widgets to an app.
$ meteor add accounts-weibo
accounts-weibo: Login service for Sina Weibo accounts
$ meteor add accounts-password
accounts-password: Password support for accounts.
$ meteor add jquery
jquery: Manipulate the DOM using CSS selectors
$ meteor add bootstrap
bootstrap: UX/UI framework from Twitter
$ meteor add underscore
underscore: Collection of small helper functions: _.map, _.each, ...
打开项目目录下的meteor-example.html,我们给它加上bootstrap的标准菜单,并添加loginButtons这个widget(是accounts-ui中定义的):
<body>
  <div class="navbar">
    <div class="navbar-inner">
      <div class="container">
        <a class="brand" href="#">Meteor Example</a>
        <div class="nav-collapse collapse">
          <ul class="nav">
            <li><a href="#">{{loginButtons}}</a></li>
          </ul>
        </div>
      </div>
    </div>
  </div>
  {{>hello}}
</body>
打开浏览器,可以看到多了一个菜单,里面有一个登录按钮。点击该按钮,你会发现这个简单的项目目前已经支持weibo和邮件登录两种方式了。
你需要先到 http://open.weibo.com/apps 创建你自己的微博app。将key和secret填入这里的微博接入配置窗口并按提示配置微博app,就可以使用了(大范围使用请先通过weibo app审核)。
点击 create account,输入邮箱和密码,创建一个账户。可以看到账号已创建,并且自动登录进来。
你可以继续试验登入,登出,忘记密码(注意,本地环境可能无法发送找回密码的邮件)。目前我们还没有撰写一行代码,已经有了一个完备的用户系统。
如果你好奇这一切是怎么回事,那么请接着阅读。打开浏览器当前页面(http://localhost:3000)的console(建议使用chrome),尝试以下命令:
> $(document)
< [#document]
> _.max([1,2,3,4])
< 4
神奇吧,上一步add了jquery和underscore这两个package后,你的项目已经自动包含了这两个库。接下保持在登录状态。在console中输入:
> Meteor.userId()
< "dd0ed681-75e4-4d8c-b1fa-8b7dba8a2b16"
> Meteor.user()
< Object
_id: "dd0ed681-75e4-4d8c-b1fa-8b7dba8a2b16"
emails: Array[1]
0: Object
address: "a@b.com"
verified: false
__proto__: Object
length: 1
__proto__: Array[0]
__proto__: Object
登出当前用户,在console中输入:
> Meteor.userId()
< null
> Accounts.createUser({email:'e@f.com', password: '123456'})
< undefined // 注意这个时候e@f.com已经是登录状态,见浏览器菜单栏。
> Meteor.userId()
< "b9947f4f-0916-4ea9-88ea-7984b7f43875"
> Meteor.logout()
> Meteor.loginWithPassword('e@f.com', '123456')
< undefined // 注意这个时候e@f.com又变成登录状态,见浏览器菜单栏。
我们得出如下结论:
Meteor的Collection一旦定义后,在client/server端都可以访问。在meteor-example.js里输入如下代码创建collection:
Messages = new Meteor.Collection('messages');在浏览器的console中可以访问该collection:
> Messages.find().fetch()
< []
> Messages.insert({username: Meteor.user().emails[0].address, content: 'Hello Hanmeimei, how are you?'})
< "21354a36-ec04-4b47-8000-e01ef2267c43"
为了有更好的显示效果,我们再加一些代码显示Messages里的内容:
在meteor-example.html中我们加入一个新的template:
<template name="message">
  <div class="hero-unit">
    <h1>Messages</h1>
    <ul>
      {{ #each messages }}
      <li>{{ username }} says: {{ content }}</li>
      {{/each }}
    </ul>
  </div>
</template>
然后在body中引用它,在 {{ >hello }} 后,加入 {{ >message }}。
有了显示message的template,我们还需要提供数据的controller。在meteor-example.js中 if(...client)的scope中,加入新的message的controller:
Template.message.messages = function() {
    return Messages.find()
}
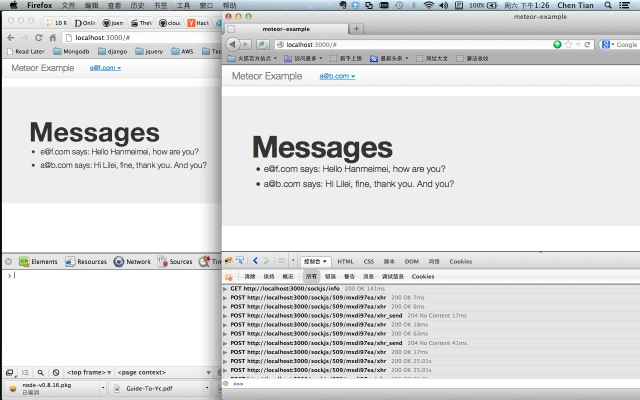
现在看看浏览器中发生了什么变化。是滴!页面自动刷新,显示我们刚才创建的内容了。现在我们打开另外一个浏览器,进入 http://localhost:3000,用一个新的账户登录。然后在console里输入(这里建议使用firefox和chrome做测试):
> Messages.insert({username: Meteor.user().emails[0].address, content: 'Hi Lilei, fine, thank you. And you?'})
< "c6ec8655-4644-48b2-a6be-7a3973dd7581"
奇迹出现了,不仅仅是当前窗口得到了更新,另外一个浏览器有了最新的消息!我们仅仅写了几行代码,就已经见到一个实时聊天系统的雏形了!

从刚才的例子中我们已经看到了Meteor的live update的威力。任何时候,当数据发生改变的时候,Meteor会自动在客户端重新渲染改动相关的DOM。
借助socket.io,Meteor在server和每个客户端间保持了一个web socket连接。当有数据发生改变时,服务器会将新的数据publish到所有的客户端。这是Meteor的基因,因此,使用Meteor的任何app都天然具备realtime的特性。
Meteor不算是标准的MVC framework。如果非要往上套,Collection算是Model层,Template对象算是Controller层,而View是html中的template。
今天就先写这么多,感兴趣的童鞋可以为聊天室加一个输入界面,这样说句话不必费劲地敲代码了。本文的完整代码可以在这里下载: chat.tgz。
依旧例,送上小宝今日照片。


如果您对本站的文章感兴趣,欢迎订阅我的微博公共账号:程序人生。每次博文发表时,您都能获得通知。此外,公共账号还会不定期推送一些短文,技术心得,供您参考。

